Adding HelpGuides to Claude as an MCP Connector
HelpGuides natively supports Model Context Protocol (MCP), which means you can connect your documentation directly to Claude as a custom connector. Once connected, Claude can search, retrieve, and reference your documentation in real time — without crawling or indexing.
What you'll need
- A published HelpGuides project with MCP enabled
- Your project's MCP URL (found in your project settings)
- A Claude account on a Pro, Max, Team, or Enterprise plan
- Note: Free plan users are limited to one custom connector. If you already have one connected, you will need to remove it before adding HelpGuides.
Finding your MCP URL
Your MCP URL is unique to your HelpGuides project. It follows this format: https://[your-subdomain].helpguides.io/mcp
You can find your exact MCP URL in your project settings under the Integrations section. See Model Context Protocol for a full reference of available endpoints and capabilities.
Adding HelpGuides to Claude (claude.ai)
- Sign in to claude.ai
- Click your username in the bottom-left corner and select Settings
- Click Connectors in the left sidebar
- Scroll to the bottom and click Add custom connector

- Enter a descriptive name (e.g. My Documentation)
- Paste your MCP URL into the Remote MCP server URL field
- Click Add
- Click Connect next to your new connector and complete the OAuth authentication flow
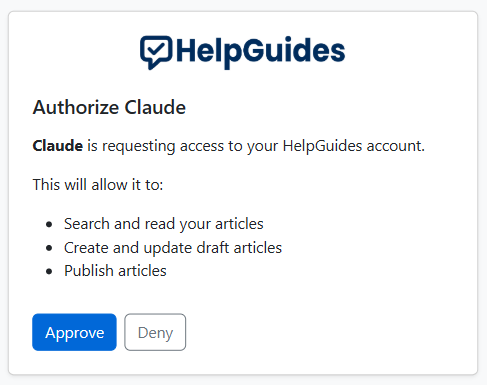
Once connected, Claude can query your documentation directly from any conversation.
Team and Enterprise plans: An org admin must first add the connector at the organization level under Organization Settings → Connectors before individual users can authenticate. Individual users follow the same steps above once the connector has been enabled org-wide.
Adding HelpGuides to Claude Code
If you use Claude Code, MCP servers are configured via the CLI rather than the connector UI. Run the following command in your terminal:
Then open a Claude Code session and run /mcp to trigger the OAuth authentication flow. Once authenticated, your HelpGuides documentation tools will be available in all Claude Code sessions.
To verify the server was added successfully:
By default, the server is scoped to the current project. Add --scope user to make it available across all your projects.
Adding HelpGuides to Claude Desktop
Claude Desktop uses a JSON configuration file to manage MCP servers. Add the following to your claude_desktop_config.json file:
The config file is located at:
- macOS:
~/Library/Application Support/Claude/claude_desktop_config.json - Windows:
%APPDATA%\Claude\claude_desktop_config.json
Save the file and restart Claude Desktop. Your HelpGuides connector will be available on next launch.
Enabling the connector in a conversation
- Open a new conversation in Claude
- Click the + button in the lower-left of the chat interface
- Hover over Connectors
- Toggle on your HelpGuides connector
Claude will now have access to your documentation for the duration of that conversation.
What Claude can do with your documentation
Once connected, Claude has access to the MCP tools exposed by your HelpGuides project, which currently include:
- search — search your documentation by keyword or topic
- get_instructions — retrieve workflow guidance for working with your docs
- create_article — draft new articles directly from a conversation
- update_article — edit existing articles by post ID or URL
This enables AI-assisted documentation workflows — searching for existing coverage, drafting new articles, and updating content without leaving your conversation. For a full list of supported endpoints, see Model Context Protocol Endpoints.
Try these prompts
Once your connector is enabled, here are some prompts to get started:
- "Search my documentation for articles about [topic]" — find existing coverage before writing anything new
- "Create a draft article about [topic] and link to related articles" — generate a new article with internal links
- "Review this article URL and suggest improvements" — get feedback on existing content
- "Update the article at [URL] to include [new information]" — edit an article by passing its URL directly
Claude will search your docs, draft content, and push updates as drafts for your review — you always have the final say before anything is published.
Revoking access
To disconnect HelpGuides from Claude at any time:
- claude.ai: Go to Settings → Connectors, click the three-dot menu next to your HelpGuides connector, and select Remove
- Claude Code: Run
claude mcp remove helpguidesin your terminal - Claude Desktop: Remove the helpguides entry from your
claude_desktop_config.jsonand restart Claude Desktop
This immediately revokes Claude's access to your documentation. You can reconnect at any time by following the setup steps above.
Troubleshooting
The connector shows as disconnected
Re-authenticate by clicking Connect next to the connector in Settings → Connectors, or run /mcp in Claude Code to re-trigger the OAuth flow.
The connector was added mid-session and isn't showing tools
MCP connectors are loaded at session start. Start a new conversation and enable the connector from the + menu.
OAuth errors during authentication
Ensure your HelpGuides project has MCP and OAuth enabled in your project settings. Contact support if the issue persists.
For more on how HelpGuides implements MCP, see Model Context Protocol and Using LLMS.txt.